Module 9 - ScopTEL IP PBX Software - Automatic Provisioning System
Background
The APS (Automatic Provisioning System) is used to create the required configuration files needed for many SIP end devices. The APS assigns SIP usernames and passwords, network options, time settings, QoS settings, dial plans , firmware upgrade policies, soft key programming, DSS/BLF programming, security settings, DTMF modes, LDAP settings,
Templates can be configured to simplify tedious configuration settings for as many supported SIP end points as required
Extensions you wish to assign to a MAC address must already exist so they must be created first before trying to assign then them to hardware using the APS.
Here is a list of User Agents supported by the ScopTEL Automatic Provisioning System.
Security
Hackers are routinely scanning IP addresses for open ports and if they find an IP address vulnerable to brute force scanning they will execute a remote Provisioning scan using the first 6 digits of popular vendor ID’s like Polycom, Yealink and then brute force the last 6 digits of a 12 digit MAC address.
By example a SCOPTEL server using the default HTTP listen port of 5555 can be attacked using this method. Other vendors are also vulnerable on whatever HTTP listen port they use to remotely provision IP phones.
TFTP is especially vulnerable on UDP port 69 because no specific path is required to the MAC.cfg file. Only the <MAC>.cfgvariable is required to harvest the MAC.cfgfile. TFTP should be denied on the Firewall whenever possible.
If you have enabled Telephony>Configuration>Security>Flood Protection and the SCOPTEL Firewall and Telephony Flood Protection (Fail2ban) Service then the remote attacker’s IP address will be blacklisted by the Firewall when a brute force attack is detected.
But if the remote attacker knows of a valid MAC address on the network then this MAC.cfg file can easily be harvested unless HTTP Authentication is configured. The exact methodology won’t be published here as this should not be public knowledge.
IP/DNS Mapping explained
The purpose of the IP/DNS Mapping it to replace a ‘dummy’ IP address or static IP address with a FQDN (Fully Qualified Domain Name)
FQDN’s are highly advantageous for the following reasons :
A public DNS A record can help a remote VoIP phone contact the SCOPTEL server’s public IP address in order to register its SIP account and update its provisioning settings.
A local DNS A record can help a local VoIP phone contact the SCOPTEL server’s public IP address in order to register its SIP account and update its provisioning settings.
If either the server’s LAN or WAN addresses changes the APS configurations will not require changing
Only the DNS A records will require any changes and since the phone will always use DNS lookups to re-register or reconfigure itself, downtime is kept to a minimum
In any of these scenarios the phone only is always configured with the same FQDN and if the DNS A record requires changing on the IP/DNS Mapping needs to be edited.
Add a new Provisioning System
From Configuration|Telephony|Provisioning click on “Add a new Provisioning System ”
From the Tenant drop list selector choose Tenant>All (Global) so that all tenants can use the same IP/DNS Mapping. Or select the specific tenant you would like to restrict the IP/DNS Mapping to.
In this example the source IP address 1.1.1.1 is a dummy address which will be replaced with customerdomain.com in the /tftpboot/<mac>.cfg files.
When done editing Add the object and carry on adding hardware based templates and then add MAC address based objects using the templates.
This replacement is automatically done for all instances of 1.1.1.1 in any template or MAC based APS object as shown in these examples :
Adding a new Hardware based template
From Configuration|Telephony|Provisioning click on “Add a new Provisioning System ”
From the Tenant drop list selector choose Tenant|All (Global) so that all tenants can use the same IP/DNS Mapping. Or select the specific tenant you would like to restrict the vendor template to.
From the Phone Model drop list select the matching hardware for the phones you will be deploying.
Make sure you click on the ‘Create Template’ checkbox.
Give this template a meaningful name

General Tab
Use the drop list selector to choose the installed firmware version of the device so this template will write compatible files.
Use the drop list to choose the preferred sync method.
Provisioning URL : enter the full path to the provisioning server in format : <http_protocol>://<WAN_IP/LAN_IP>:<Listen_on_Port>/<TFTP_Alias >/
Example : http://customerdomain.com:5555/tftpboot/
Firmware URL : Enter the full path to the provisioning server in format : <http_protocol ://<WAN_IP/LAN_IP>:Listen_on_Port >/< TFTP_Alias >/<firmware _filename>
NOTE: You must upload the matching firmware file to the server directory /tftpboot/
Click on the Server tab when done
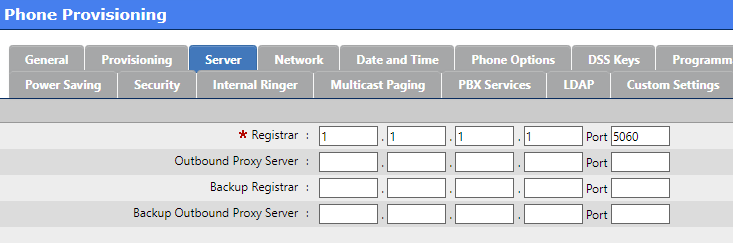
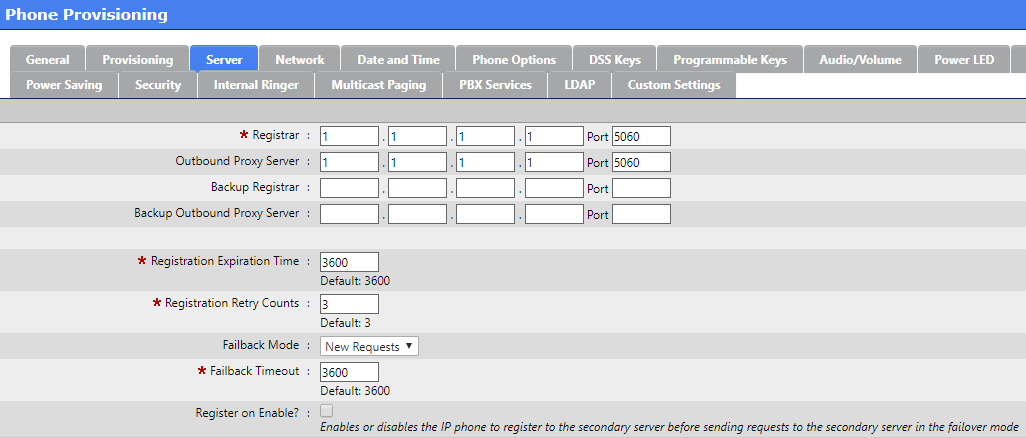
Server
In the Registar boxes enter the dummy IP address created for the IP/DNS Mapping
Click on the Network tab when done
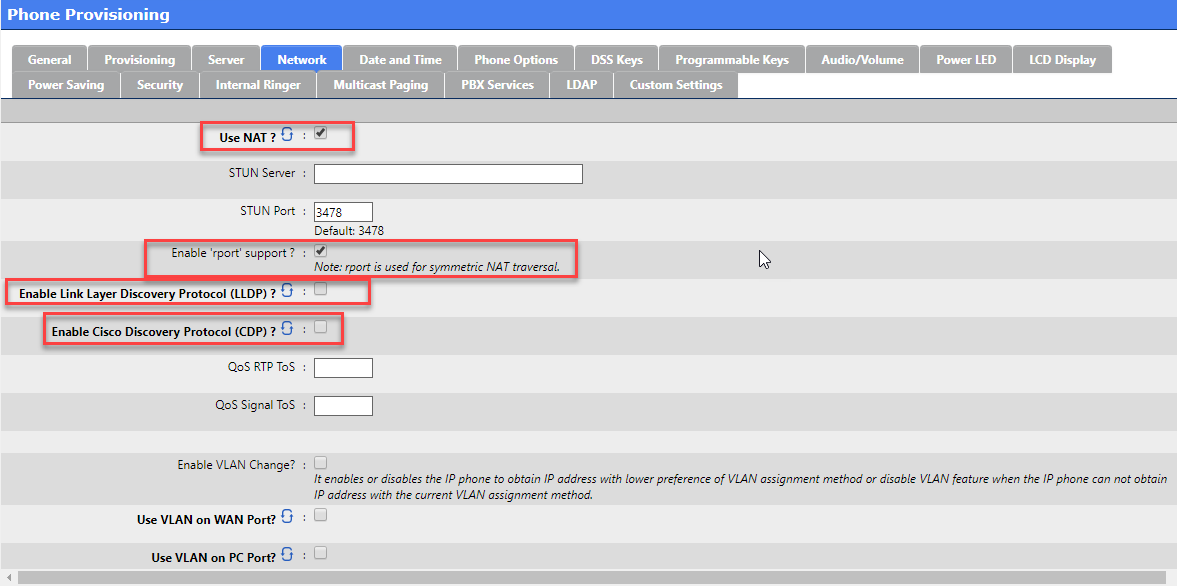
Network
Use NAT option is recommended so that rport may be enabled (this enables the necessary SBC settings for this object).
STUN Server : not recommended
Enable Link Layer Discovery Protocol (LLDP ) is an optional open standard Layer 2 protocol that allows automatic VLAN membership.
Enable Cisco Discovery Protocol (CDP ) is an optional Cisco Layer 2 protocol that allows automatic VLAN membership.
Click on Date and Time tab when done
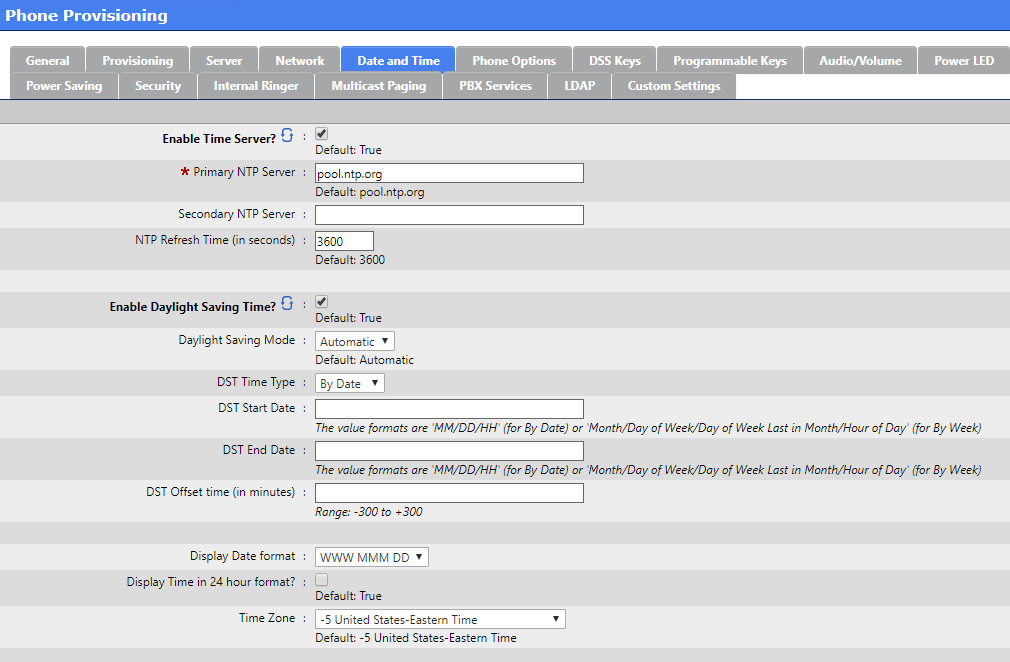
Date and Time
Modify the Date and Time configuration if needed
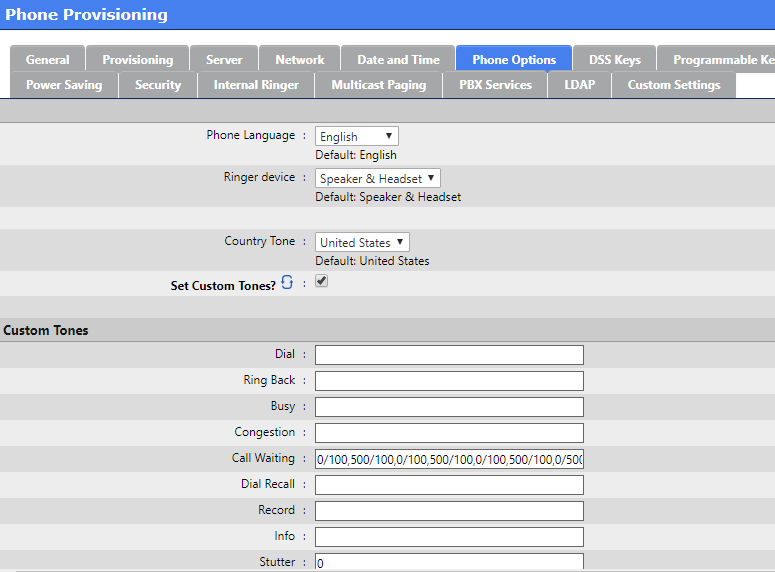
Click on Phone Options when done
Phone Options
Modify settings like :
The Phone Language for the end user interface
Country Tone
Set Custom Tones
Any other preferred options
Click on DSS Keys when done
DSS Keys Vs Programmable Keys
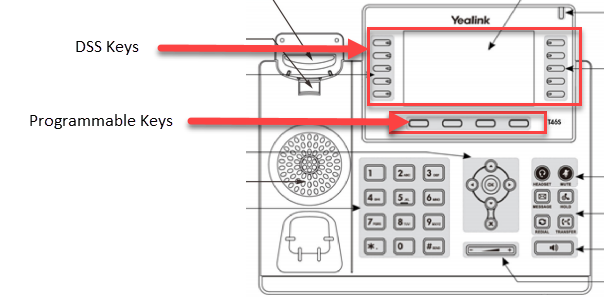
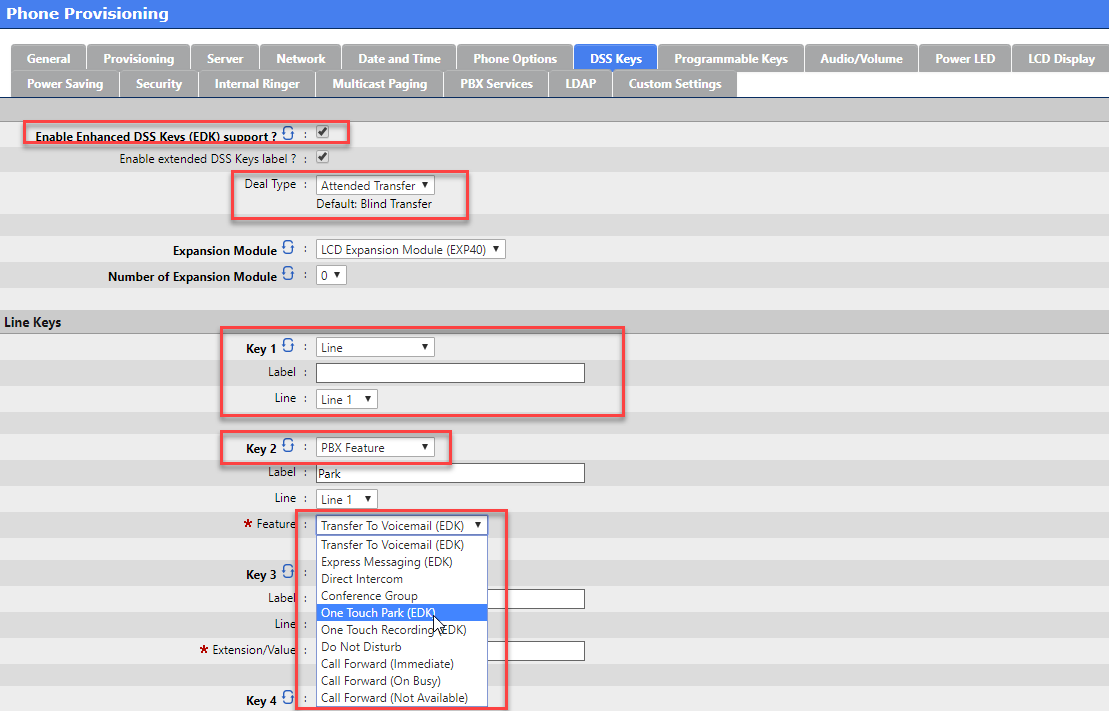
DSS Keys
Enable Enhanced DSS Keys (EDK) support to enable SCOPTEL PBX Features in the drop lists
Deal Type recommendation is Attended Transfer for proper PBX Features functionality
Expansion Module type and Number of Expansion Modules assigned is dependent on additional hardware and optional.
Key 1 is used for the Extension assignment. Leave the Label blank and the Line drop list set to Line 1. NOTE : each line key can process 8 concurrent calls. There is no need to have more than one Key assignment per Extension. Remaining Key buttons can be allocated for BLF, Key Event, Speed Dials, Features, DTMF events, Directory lookups, etc…
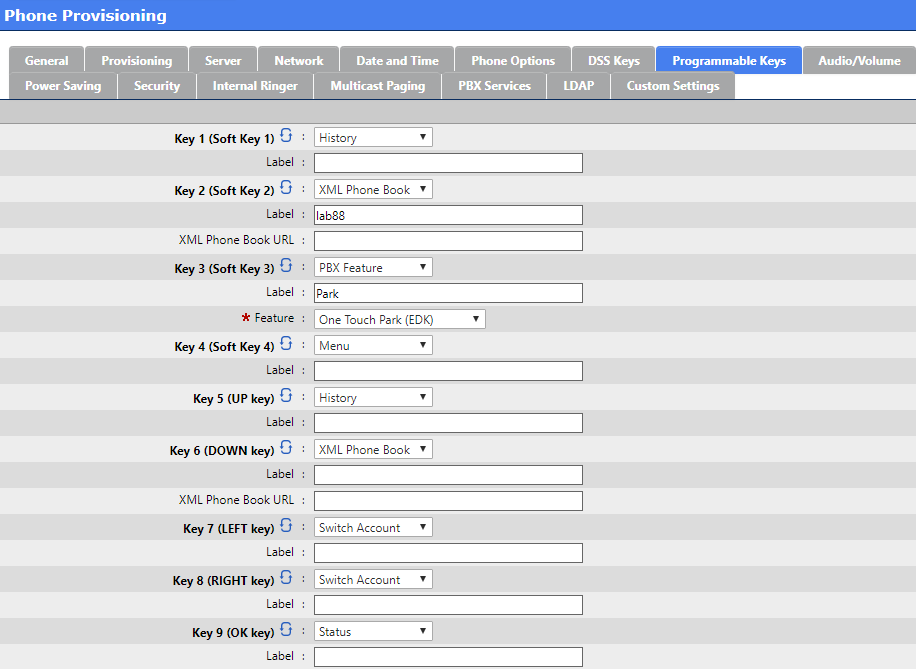
Click on Programmable Keys when you are done editing.
Programmable Keys
Programmable Keys can be reassigned from their Factory Defaults
Click On Security tab when done
Security
It is recommended to change the Admin Password
It is quite common for a user to experience ghost calls on their phones. This happens when a firewall binds the default SIP signaling port udp / 5060 of the phone with the public interface of the firewall as a badly implemented SIP ALG.
Public tools like http://blog.sipvicious.org/ are often used to port scan public IP addresses on port 5060 looking for devices with weak security to exploit. When this happens we often see and hear the ghost calls.
To prevent this it is recommended to : Disable 'Allow Direct IP Call' and 'Enable Accept SIP Trust Server Only'
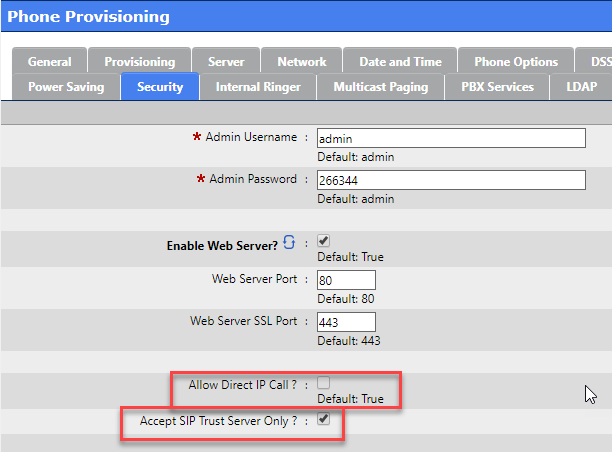
Some NAT Routers will bind any SIP device using port 5060 directly to the WAN interface. If this is the case a port 5060 port scan by a malicious User Agent can cause the phone behind the NAT router to ring anonymously.
To circumvent:
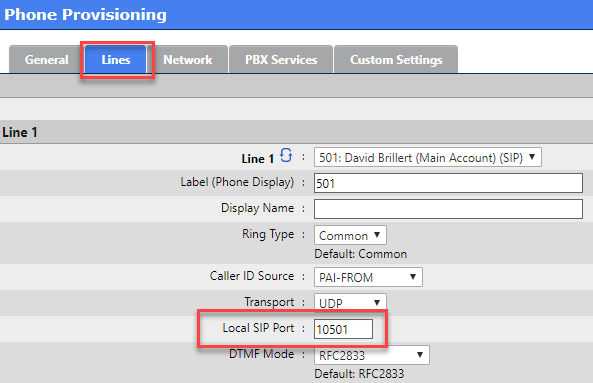
On the Line Key assignment use a non standard UDP port between the default RTP values of udp/10000 - 20000
By doing this you do not have to open additional ports on the ScopTEL firewall.
NOTE: that the Local SIP Port cannot be configured in any template and must be assigned to each APS MAC configuration.
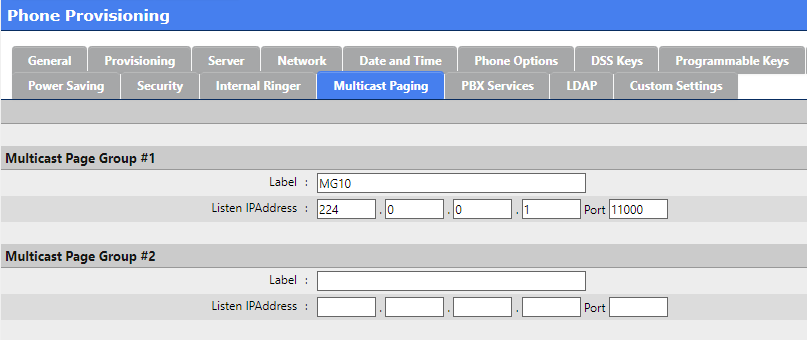
Click on the Multicast Paging tab when done
Multicast Paging
Multicast Paging is beyond the scope of this document.
Configure your multicast paging group settings.
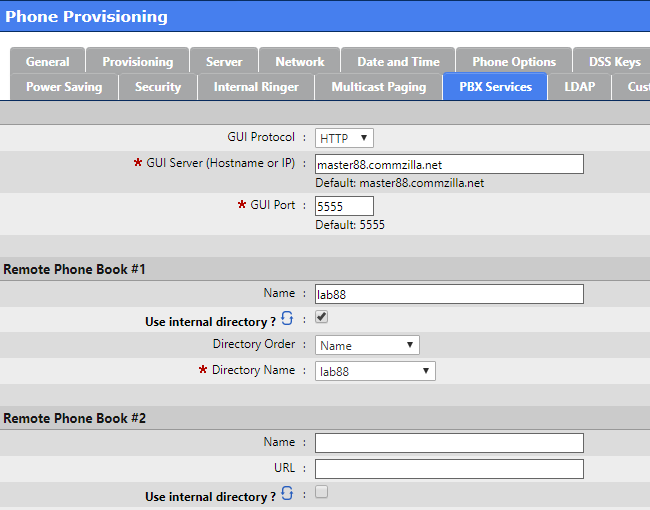
When you are finished setting up Multicast Paging click on the PBX Services tab
PBX Services allow you to configure the URL for the phones to do Directory Lookups
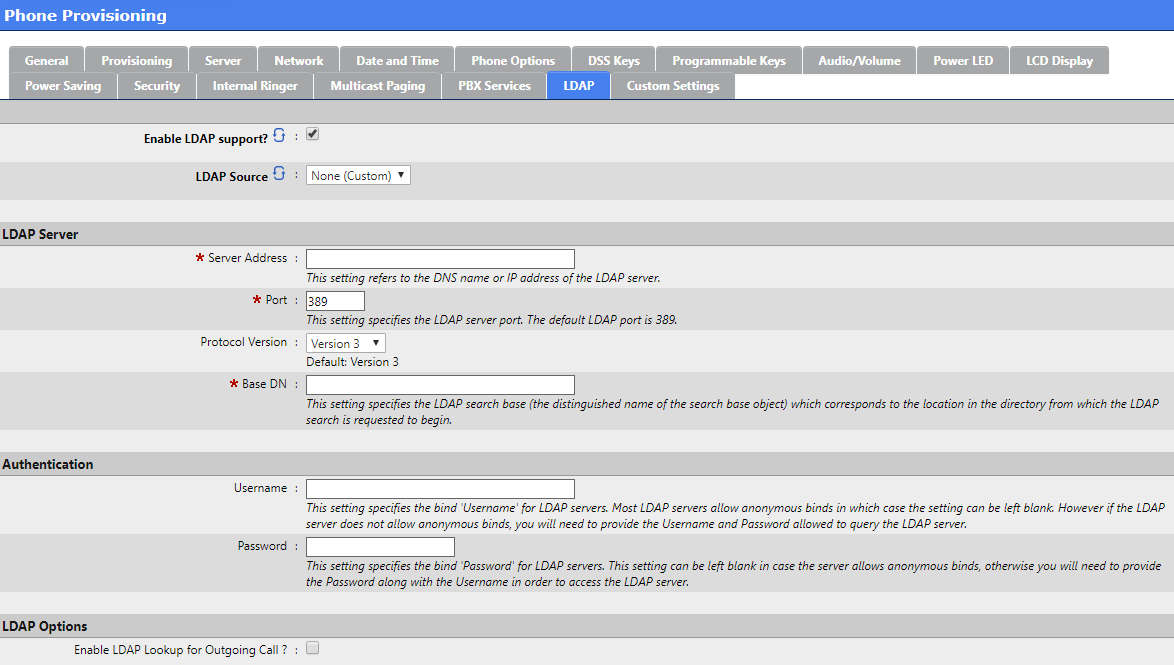
Click on the LDAP tab when done
LDAP
LDAP configuration is beyond the scope of this document
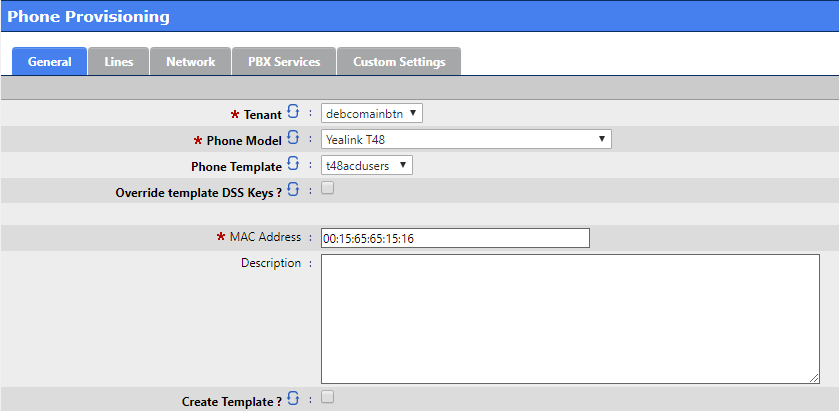
Adding a MAC address and assigning an Extension
From Configuration > Telephony > Provisioning click on “Add a new Provisioning System ”
Assigning a MAC address
You must use the Tenant selector to choose a dedicated Tenant. You cannot use Tenant ‘All (Global)
Use the Phone Model drop list selector to find matching hardware for your phone deployment
Choose from an already configured template
Enter the unique MAC address of your hardware in the MAC Address field
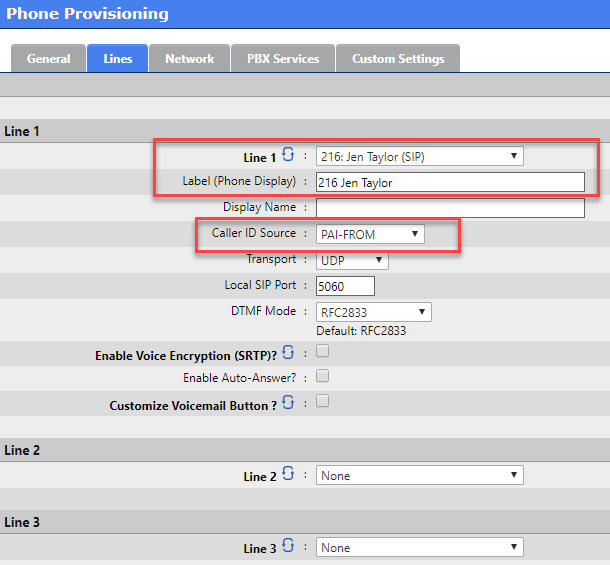
Click on Lines when done
Lines
In the template example only one DSS Key was given a Line 1 assignment, so we will only configure Line 1
Use the drop list selector to assign an unassigned Extension
Enter the Label (Phone Display) text you wish to display on the phone’s LCD screen
In order to support P - Asserted CallerID connected line updates you must change the default Caller ID Source selection to PAI - FROM
You may change the Local SIP Port to any custom value from 10000 - 20000 to reduce the likelihood of ghost calls
You may optionally enable SRTP Voice Encryption but this has pre - requisite configurations that must be done in advance. Refer to :
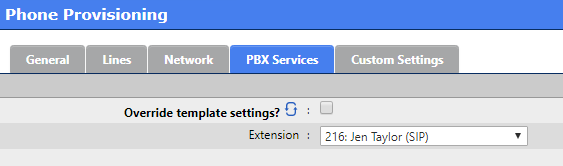
Click on the PBX Services tab when done
PBX Services
Using the drop list selector choose the Extension you assigned to Line 1
Click on Add when done
Provisioning
Security is a critical so before proceeding refer to : https://service.scopserv.com/portal/en/kb/articles/scoptel-securing-configuration-files-with-http-authentication
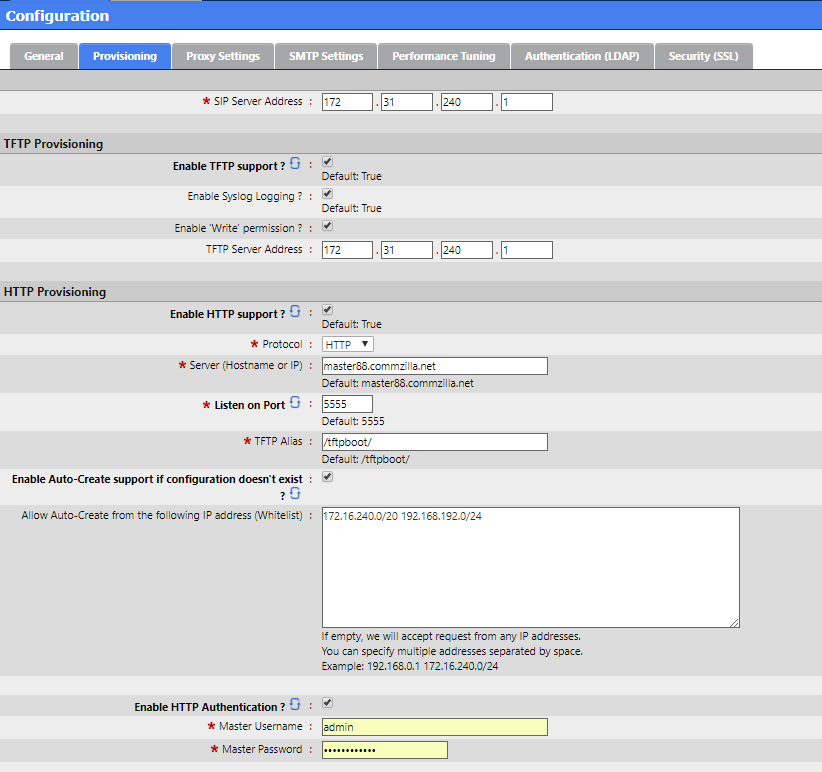
The SIP Server Address is used for the Auto Provisioning Feature Code at Telephony Settings : Configuration>Provisioning. It must be an address physically assigned to the server
The TFTP server address must be an address physically assigned to the server and should be the address bound to the interface running DHCP.
The Server Hostname must have a matching DNS A record on the DNS Server supporting this network.
If ‘Enable Auto - Create support if configuration doesn’t exist’ is enabled when DHCP detection detects a supported device it’s MAC address will be added to the APS MAC address list. If this option is enabled then configuring the Whitelist should be considered mandatory for security purposes.
Supported devices are : Aastra, Snom, Polycom, Yealink
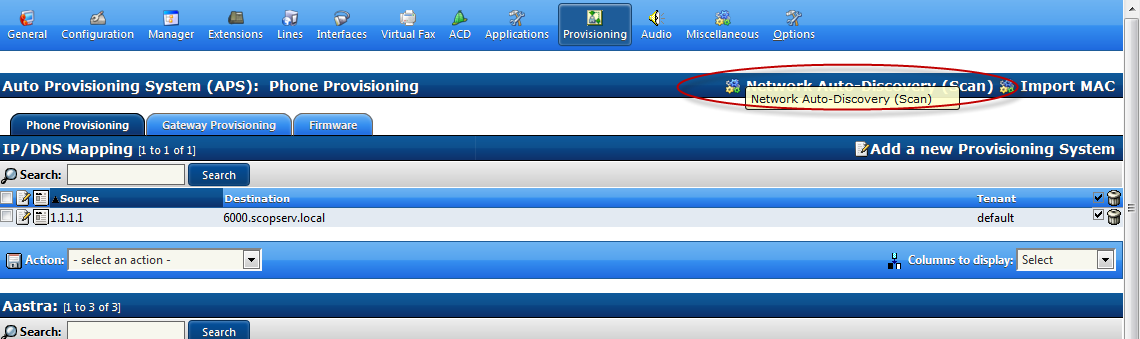
In addition to manually configuring MAC addresses for supported SIP devices SCOPTEL also supports several mass deployment methods
Text import of MAC addresses from a file
Network Scan of selected IP addresses on selected subnets
DHCP detection of new devices when the SCOPTEL DHCP server is the only DHCP server on the LAN SCOPTEL
Minimum Package Requirements:
scopserv_yum install nmap (if nmap is not already installed)
scopserv-network-2.6.4-1.nodist. scopserv.noarch.rpm
scopserv-server-2.6.4-1.nodist. scopserv.noarch.rpm
scopserv-telephony 25-2.6.52-1.el5.scopserv.noarch.rpm
Text import of MAC addresses from a file
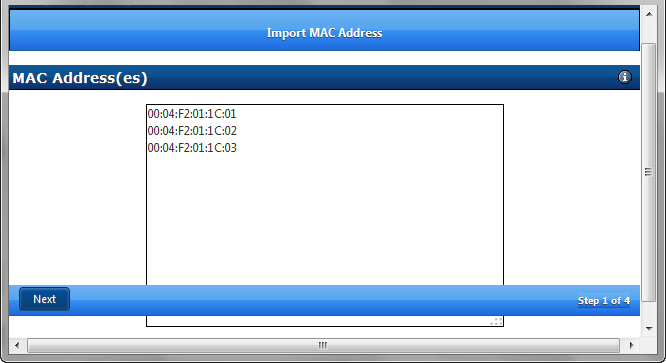
From the APS Main Page click on Import MAC
Enter a list of MAC addresses or copy and paste from a ASCII file
Click Next
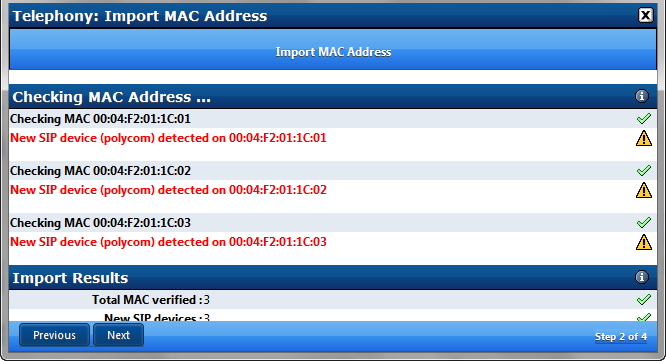
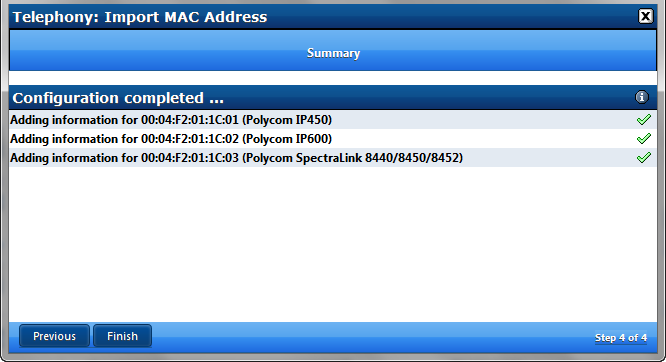
A New SIP device list appears showing that the MAC vendor ID matches supported hardware (in this case 3 new Polycom phones)
Press Next
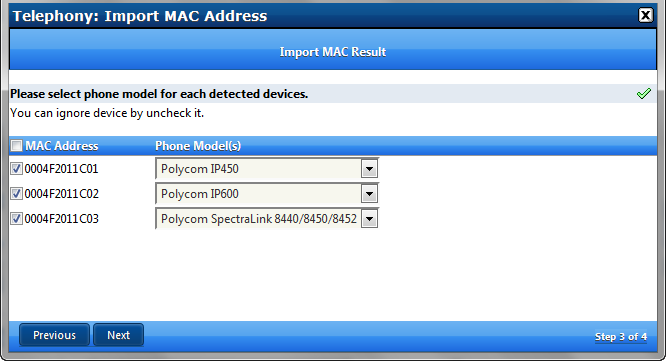
Since the system cannot know the model number of each device you must select a matching model number from the list for each MAC address using the drop down list selections
Click Next
Click Finish to add the new MAC’s to the APS list
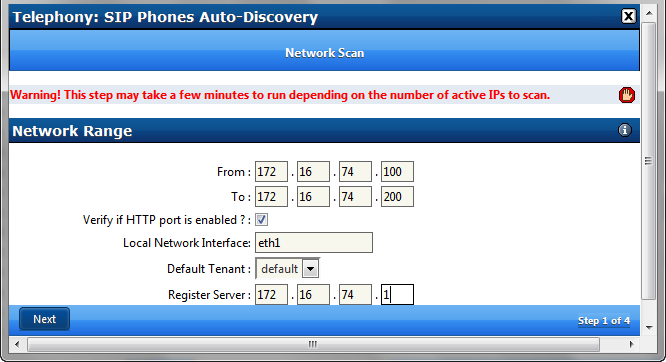
Network Scan of selected IP addresses on selected subnets
This method will only add un-configured MAC addresses to the APS list
Click on Network Auto - Discovery (Scan)
Enter the first available IP address on a valid subnet (normally the first IP address in a DHCP pool)
Enter the last available IP address on a valid subnet (normally the last IP address in a DHCP pool)
Choose the Network Interface that services the valid subnet
Choose the desired tenant
Enter the IP address of the SIP Server (usually the IP address of the Network Interface servicing the local subnet)
Click Next
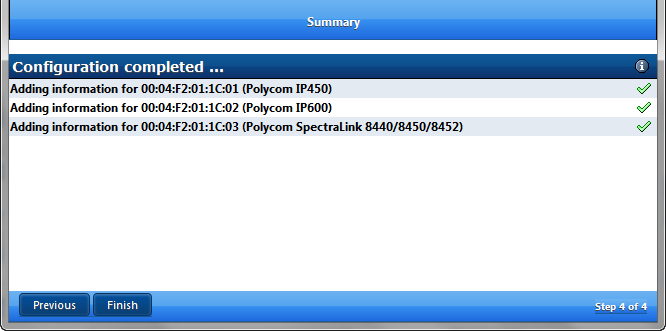
The new window will show a list of detected MAC addresses
Automatic Addition of Supported Devices via DHCP Classes
Pre-requisites :
Network Module Pre-requisites :
Network>DHCP Server must be enabled and properly configured
By creating DHCP Classes a default list of supported devices will be added by known Vendor ID.
Each Class will use default provisioning options for each supported hardware vendor
This simplifies the editing of options like TFTP option 66 or 150 depending on vendor
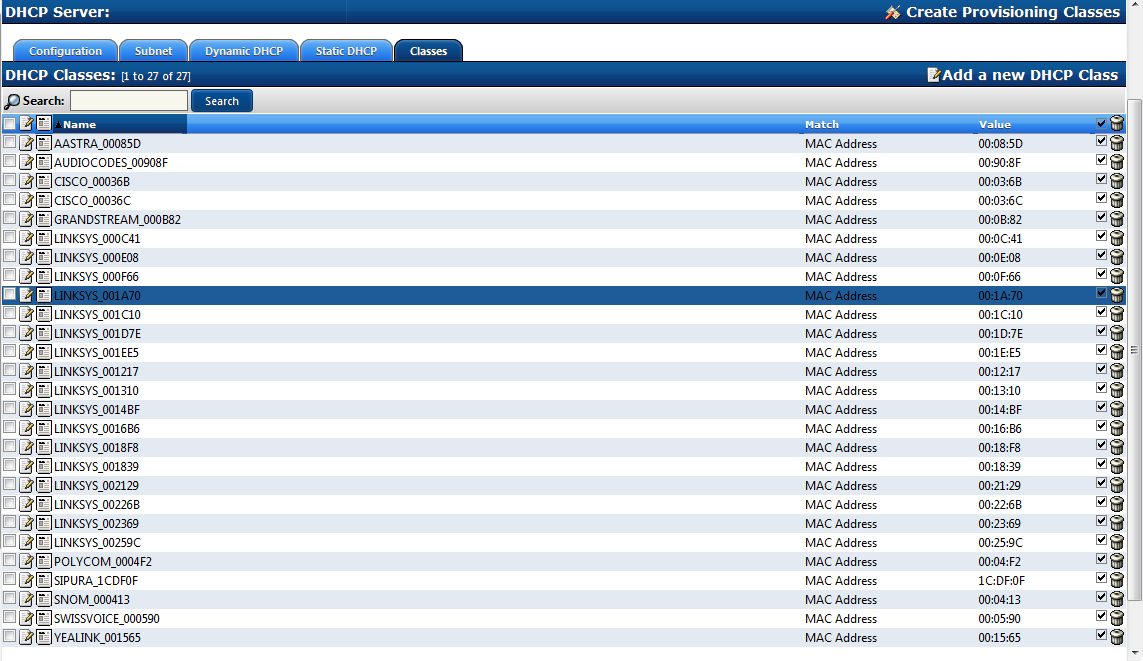
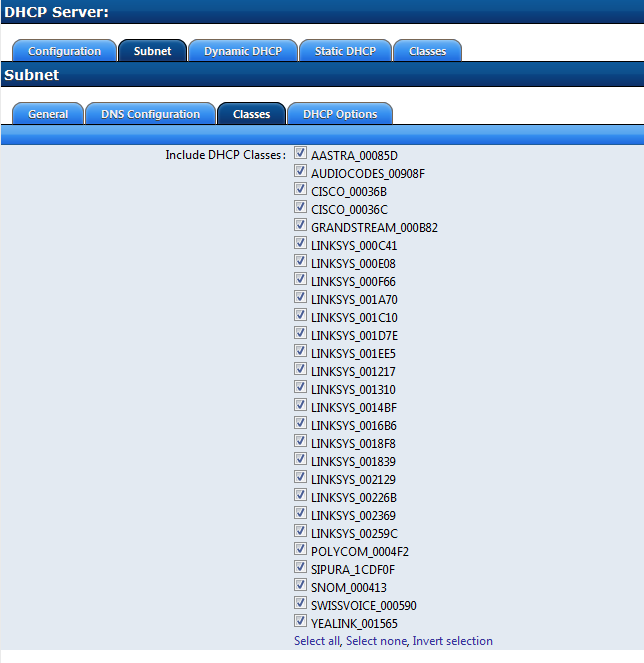
After creating the Default Classes the Classes must be added to the DHCP Subnet
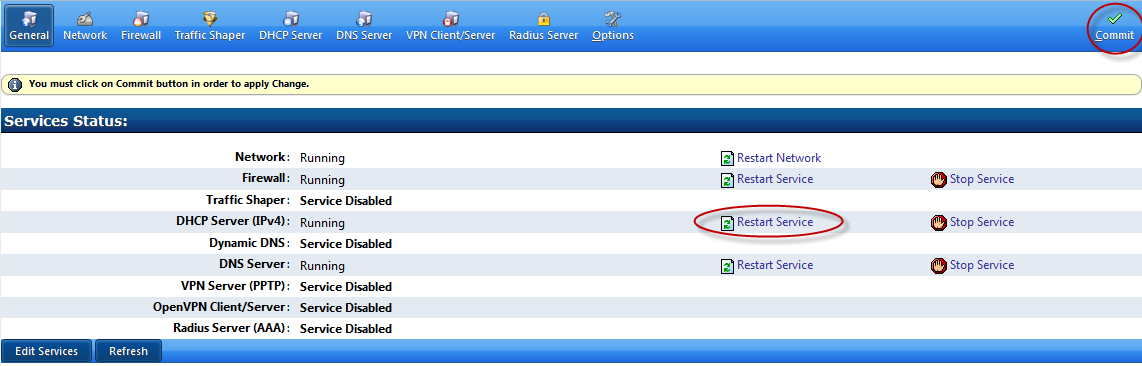
Commit Network changes
Restart the DHCP Server Service to enable the changes
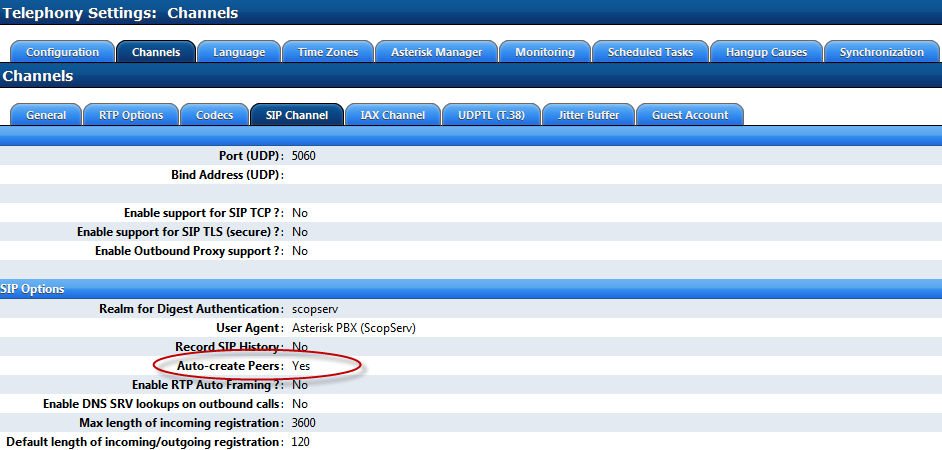
Telephony Module Pre-requisites :
Telephony>Configuration>Channels>SIP Channel>Auto-Create Peers=yes
WARNING Auto-Create Peers can be vulnerable to malicious SIP attacks so the server should not have SIP ports exposed to the public (firewall your SIP ports to external subnets and follow SCOPSERV security best practices)
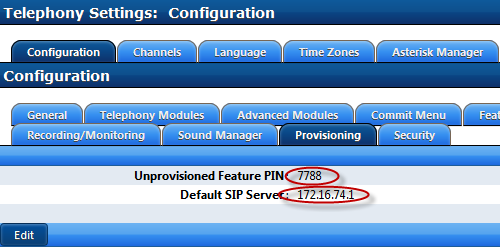
Telephony>Configuration>Provisioning
Change the Unprovisioned Feature PIN to a complex number for security
Enter the SIP Server address required for registration
Save and Commit changes
USAGE
Plug a supported SIP device into the voice subnet
Wait for it to boot (it may reboot after it downloads its configuration from the server for the first time)
Once the phone boots up you should see its MAC address in the APS list as an unprovisioned device
Once the phone displays UNPROV on its display you can begin the registration process
Dial any phone number to hear the password prompt
Enter the Provisioning PIN number defined in Telephony>Configuration>Provisioning using the keypad
Enter a defined but unused extension number using the keypad when prompted
Edit the MAC address in the APS list and change any required settings like the template used, name, soft key assignments etc.
Commit
Reboot the phone to download the final configurations
Related Articles
List of Supported Phones and Softphones in the ScopTEL Automatic Provisioning System
Alcatel ======= Alcatel Temporis IP100 Alcatel Temporis IP150 Alcatel Temporis IP200 Alcatel Temporis IP300 Alcatel Temporis IP600 Alcatel Temporis IP700G Alcatel Temporis IP800 Alcatel Temporis IP1850 Alcatel Temporis IP2015 AudioCodes ========== ...Fanvil Devices Now Fully Supported by ScopTEL Automatic Provisioning System
ScopServ is pleased to announce we have added full support for Fanvil Devices in the ScopTEL Automatic Provisioning System. About Fanvil https://fanvil.com/ Fanvil is an established VoIP desktop phone developer and manufacturer from China. Fanvil has ...ScopTEL - DHCP APS Configuration
DHCP Configuration DHCP detection of new devices when the ScopTEL DHCP server is the only DHCP server on the LAN. During DHCP acquisition a newly installed and supported SIP device can be added to the APS list automatically. DHCP discovery can ...ScopTEL - Cisco SIP Phone Integration
Cisco Phone Background Cisco is known for their SCCP Protocol, however they have acquired several companies over the years and have developed SIP firmware for use in their proprietary call control platforms and Third Party Call Control (3PCC). One of ...ScopTEL IP PBX Software - Basic Installation Hierarchy for Telephony Server
Basic Installation Hierarchy for Telephony Server Therefore the purpose of this document is to provide a visual walkthrough of a very basic but functional installation for one tenant. This tutorial does not include an overview of the overall network ...