Background
The ScopTEL IP PBX supports different methods for
High Availability and replication of MySQL databases; this article will
explain the easiest way to configure two (2) servers in a Main / Main Server (Circular) scenario using RSYNC to synchronize Asterisk and /tftpboot directories.
We will show how to replicate the configuration, voicemail, and prompts from the Master with the IP address 192.168.192.79 to a Backup (192.168.192.60) using a Floating IP Address (192.168.192.50 /24).
Requirements
Both servers must use the ScopServ installation disk (ISO). The image is available to download at http://download.scopserv.com/iso/
You must absolutely use version scopserv-server-7.9.4.0.20220404 or greater, scopserv-network-7.1.0.6.20220406 or greater, scopserv-telephony25-7.4.28.0.20220404-2 or greater.
Pop Up Blockers
Make sure you disable any Pop Up Blockers you have configured for the GUI's website.
Databases
If MySQL Replication is not enabled then the standalone database is 'scopserv'
The scopserv database includes all server and network/firewall settings etc... so enabling MySQL Replication creates the 'scopserv_repl' database excluding those settings so that they are not overwritten during replication.
To revert to the standalone database you may disable MySQL Replication but you will lose all changes applied to the scopserv_repl database.
To backup 'scopserv_repl' and restore it to a standalone server:
mysqlcheck scopserv_repl -r (this will check and repair the database before backing it up)
mysqldump scopserv_repl > scopserv.sql (will backup scopserv_repl and save the file scopserv.sql to /root)
Copy the scopserv.sql file to a remote location and then upload a copy to the replacement server's /root directory
On the new server execute:
mysql scopserv < scopserv.sql
NOTE: you will have reconfigure your license and network settings if you convert HA to standalone.
Recommendations
We highly recommend that you update all packages to the latest versions. To proceed, go to Server -> Packages Manager and click on Update Now.
If you are planning to use DRDB and not RSYNC we strongly recommend reading the ‘DRBD User’s Guide’ available at http://www.drbd.org/users-guide-8.3/ that covers all aspect of Shared Storage (DRBD), including troubleshooting information.
Preparing your Network Configuration
The floating IP address is a dedicated IP address used by both the Master and Backup
It is recommended, though not strictly required, that you run your replication over a dedicated connection. The most
reasonable choice for this is a direct, back-to-back, Gigabit Ethernet
connection using IP addresses in the same subnet. If you cannot use IP addresses in the same subnet then you cannot implement a floating IP address and bind Asterisk to a single IP address.
The Floating IP address
Allows any SIP User Agents to bind to a single IP address for SIP traffic without having to configure a primary and backup SIP Registrar and/or SIP Proxy. This means that if the Master and Backup and Floating IP are not on the same subnet then any SIP phones must be configured with the Master and Backup server addresses. SIP carriers which use static IP's to handle incoming and outgoing PSTN traffic can only bind to a single IP address so in these cases the Floating IP address is mandatory.
If you are configuring a floating IP address then you must configure the Asterisk SIP channel to bind to the floating IP
In cases where the Floating IP address cannot be used then the option must be disabled
Here is an example of a Yealink Phone template configured to use the Floating IP address in the Automatic Provisioning System.
Firewall Requirements
If each server is behind a firewall then the necessary open ports for MySQL Replication and Heartbeat are:
3306/tcp 2224/tcp 3121/tcp 5403/tcp 5404/udp 5405/udp
22/tcp is required for RSYNC
In the ScopTEL Firewall you can add these ports using Add a new Inbound Service
In these examples the Floating IP Address that will be used by VoIP devices is set to 192.168.192.50
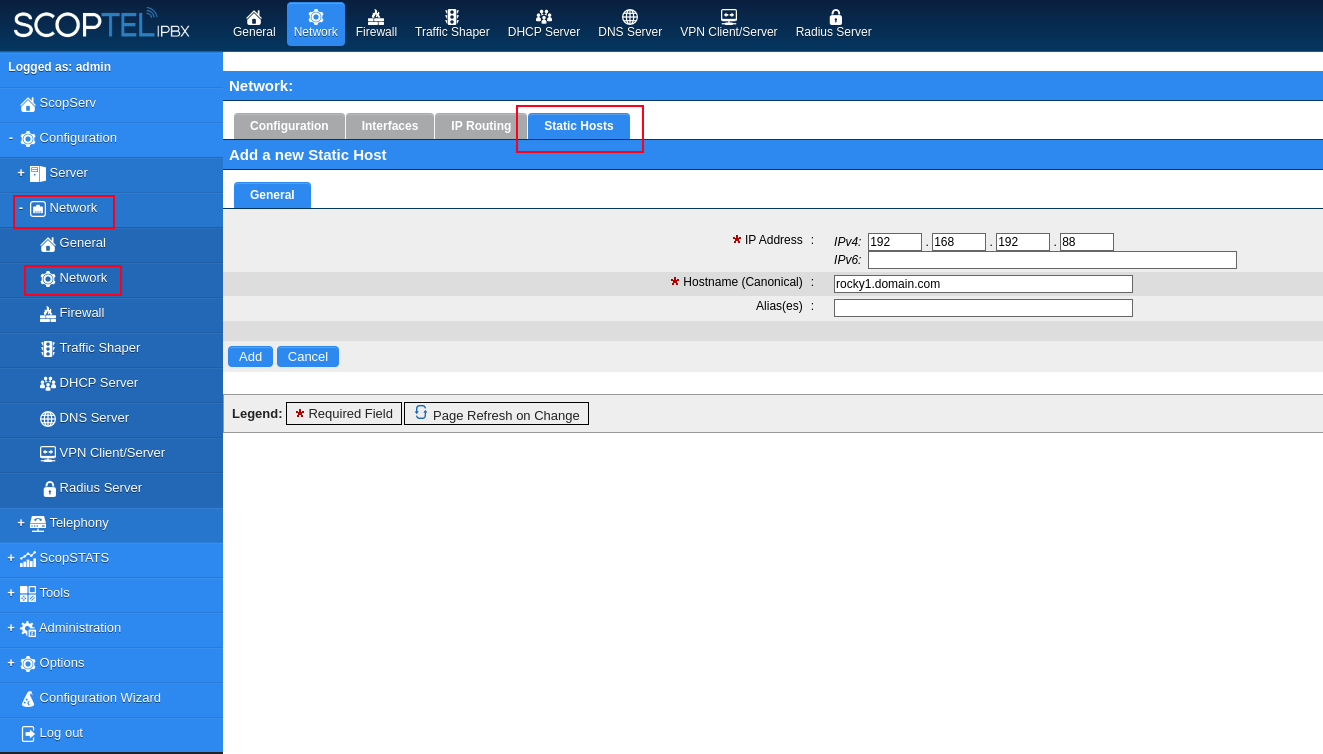
It is very important that both servers can reach each other using IP address or Hostname. On both servers, go to Network -> Configuration and verify that the specified hostname matches. On Network -> Static Hosts, you can create a hostname for each server or configure local DNS A records on a local DNS Server.
MySQL Service Configuration
Before configuring this section make sure that any Pop Up Blockers on your Web Browser are disabled for each server.
On both servers, go on Server -> MySQL Server -> Configuration and check Enable TCP/IP listening Enable MySQL Replication and Enable High Availability Support and click on the Performance Tuning tab when done
Increase the default memory limit (No Tuning) accordingly to memory availability. Then click on the MySQL Replication tab.
MySQL Replication
Set the Mode to Main / Main Server (Circular) on both servers
Set the Server Role for the Master to Main Server
Set the Server Role for the Backup Server to Backup Server.
Set the Username to root to match the default High Availability credentials or configure matching Usernames and Passwords in each field on both servers.
Click on High Availability when done
MySQL|High Availability
The Username and Password must match if you change the Default Authentication Username or Password
Click Save when done
Determine /dev path for DRBD /share Partition
The Operating System requires a 10 Gb /share partition for replication.
Normally this would be created when installing ScopTEL for the first time.
The /dev path must be printed so it can be configured in High Availability Manager.
Example, using the commands 'fdisk-l' and 'lsblk -o name,mountpoint,label,size,uuid':
The fdisk -l command prints the partition tables and the 10 GiB Partition is displayed in red
[root@rocky2 ~]# fdisk -l
Disk /dev/sdb: 465.8 GiB, 500107862016 bytes, 976773168 sectors
Units: sectors of 1 * 512 = 512 bytes
Sector size (logical/physical): 512 bytes / 4096 bytes
I/O size (minimum/optimal): 4096 bytes / 4096 bytes
Disklabel type: dos
Disk identifier: 0x4af289fa
Device Boot Start End Sectors Size Id Type
/dev/sdb1 * 2048 2099199 2097152 1G 83 Linux
/dev/sdb2 2099200 222715903 220616704 105.2G 8e Linux LVM
Disk /dev/sda: 111.8 GiB, 120034123776 bytes, 234441648 sectors
Units: sectors of 1 * 512 = 512 bytes
Sector size (logical/physical): 512 bytes / 4096 bytes
I/O size (minimum/optimal): 4096 bytes / 4096 bytes
Disklabel type: dos
Disk identifier: 0x4af289fa
Device Boot Start End Sectors Size Id Type
/dev/sda1 * 2048 2099199 2097152 1G 83 Linux
/dev/sda2 2099200 222715903 220616704 105.2G 8e Linux LVM
Disk /dev/md126: 106.2 GiB, 114030542848 bytes, 222715904 sectors
Units: sectors of 1 * 512 = 512 bytes
Sector size (logical/physical): 512 bytes / 4096 bytes
I/O size (minimum/optimal): 4096 bytes / 4096 bytes
Disklabel type: dos
Disk identifier: 0x4af289fa
Device Boot Start End Sectors Size Id Type
/dev/md126p1 * 2048 2099199 2097152 1G 83 Linux
/dev/md126p2 2099200 222715903 220616704 105.2G 8e Linux LVM
Disk /dev/mapper/rl-root: 91.3 GiB, 98025078784 bytes, 191455232 sectors
Units: sectors of 1 * 512 = 512 bytes
Sector size (logical/physical): 512 bytes / 4096 bytes
I/O size (minimum/optimal): 4096 bytes / 4096 bytes
Disk /dev/mapper/rl-swap: 3.9 GiB, 4190109696 bytes, 8183808 sectors
Units: sectors of 1 * 512 = 512 bytes
Sector size (logical/physical): 512 bytes / 4096 bytes
I/O size (minimum/optimal): 4096 bytes / 4096 bytes
Disk /dev/mapper/rl-home: 10 GiB, 10737418240 bytes, 20971520 sectors
Units: sectors of 1 * 512 = 512 bytes
Sector size (logical/physical): 512 bytes / 4096 bytes
I/O size (minimum/optimal): 4096 bytes / 4096 bytes
The lsblk command confirms the path to /share on the 10 G Partition
[root@rocky2 ~]# lsblk -o name,mountpoint,label,size,uuid
NAME MOUNTPOINT LABEL SIZE UUID
sda 111.8G
└─md126 106.2G
├─md126p1 /boot 1G 96264f0f-b501-43dc-b9ef-5a544a1be976
└─md126p2 105.2G 6V7raW-BDKL-f9mK-vCKt-mTE3-Ov5c-Qn9k93
├─rl-root / 91.3G 2e56f2a3-23c3-4748-809c-11f892737660
├─rl-swap [SWAP] 3.9G 7aa04d82-b626-480b-9226-13cb42a711da
└─rl-home /share 10G 57b3b78a-c6bf-4cba-9d5d-89b553325b22
sdb 465.8G
└─md126 106.2G
├─md126p1 /boot 1G 96264f0f-b501-43dc-b9ef-5a544a1be976
└─md126p2 105.2G 6V7raW-BDKL-f9mK-vCKt-mTE3-Ov5c-Qn9k93
├─rl-root / 91.3G 2e56f2a3-23c3-4748-809c-11f892737660
├─rl-swap [SWAP] 3.9G 7aa04d82-b626-480b-9226-13cb42a711da
└─rl-home /share 10G 57b3b78a-c6bf-4cba-9d5d-89b553325b22
So in this example the /share Device (Disk) is /dev/mapper/rl-home
Confirm the correct path on each server prior to configuration.
Configuring High Availability Services
Click on the High Availability Manager
Enable Automatic Failover (Heartbeat)
Fill in the remaining fields based on earlier configurations.
It hasn't been initialized... click on the option to Initialize it.